The significance of graphic design lies in it’s ability to connect businesses with their customers. In fact, 67% of companies that don’t use graphic design would if there were faster and cheaper options. This shows how much demand there is for design solutions that are easy for everyone to use.
It’s not a surprise since 93% of people agree that visual factors affect their choice to buy. Good design is all about visual communication — it shapes brand identity and influences decisions.
But it takes more than creativity alone to make impactful designs — you must follow a process. By tackling challenges early on, a well-structured graphic design method saves time, cuts costs, and guarantees high-quality results. Learning these seven processes will help you produce designs that genuinely appeal to your audience and improve how you approach creative tasks regardless of your experience level as a designer.
So, let’s begin with the detailed instructions for what makes and effective design process for graphic designers.
The Importance of a Structured Graphic Design Process

A structured graphic design process is key to delivering high-quality work on time. It provides a clear roadmap, breaking projects into manageable steps and minimizing revisions by addressing issues early. This approach aligns team efforts with client goals, streamlines workflows, and reduces errors — ensuring smooth collaboration and efficient progress.
Another major benefit is consistency. A structured process ensures all designs align with brand guidelines, creating a cohesive, professional look that helps increase engagement. By incorporating clear feedback loops, it catches mistakes early and keeps communication on track.
Research underscores the importance of good graphic design. According to Web FX, 94% of users reject or mistrust websites due to design-related issues like cluttered layouts and poor navigation. A structured method helps graphic designers avoid these problems so the end results are polished and easy to use — and adaptable to various types of graphic design. There’s a big difference between bad and good graphic design.
In short, a structured process:
- Aligns teams and clients, reducing misunderstandings.
- Speeds up workflows and task prioritization.
- Ensures consistent, error-free designs.
This method keeps projects focused, efficient, and effective — delivering results that stand out in a competitive landscape while also avoiding common mistakes.
What Needs to Be Done Before Starting a Graphic Design Project
Starting a graphic design project takes careful preparation to set things up for success. The first step is creating a solid technical brief. This document should make the project’s goals, deliverables, timeline, brand standards, audience, and budget all very clear. Setting up a kickoff meeting and assigning roles right away helps make sure that everyone is on the same page and saves confusion later on.
Preparation also involves anticipating potential roadblocks and creating a plan that keeps things running smoothly. A detailed brief helps eliminate guesswork, giving all stakeholders a clear understanding of the project’s direction. Adding visual examples, like styles or designs you admire, can guide the creative process and spark inspiration.
Moreover, using the right tools can make a big difference in how smoothly the project flows. For example, Google Trends can help you understand what’s resonating with your audience during the research phase, while tools like Figma allow graphic designers and clients to collaborate in real-time. These resources keep communication clear and ensure that the project stays on track from start to finish.
Here’s a quick comparison of useful tools for different stages:
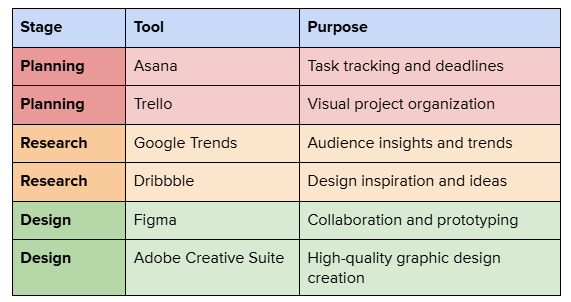
Around 35.5% of content marketers rely on online tools for graphics — and for a good reason. These tools help save time, streamline workflows, and make it easier to stay creative and adaptable throughout the graphic design process.
✅ Pro tip: Wondering how to use ai for graphic design? Explore simple methods to streamline tasks and boost visual creativity.
By setting the stage with clear goals and well-chosen resources, you eliminate confusion and create space for innovation. With everything aligned from the start, your team can channel their energy into crafting designs that resonate and achieve results — without the usual headaches or delays.
7 Key Steps of The Graphic Design Process
A successful design process in graphic design goes beyond creativity — it has to include a plan that turns ideas into impactful designs. With a well-defined structure, designers can blend innovation with strategy, ensuring every project runs smoothly and delivers results that connect with the audience. Let’s dive into the key steps that bring this process to life.
1. Reviewing the Technical Brief
A technical brief is the cornerstone of a successful graphic design creative process. It aligns stakeholders, clarifies expectations, and provides a clear path forward for the design team. Without a well-thought-out brief, projects risk delays, miscommunication, and scope creep.
A technical brief should clearly outline the following:
- Company information: Background details that inform the design’s tone and purpose.
- Brand guidelines: Fonts, colors, and imagery to maintain brand identity across deliverables.
- Project objectives: Measurable goals such as improving user engagement or driving conversions.
- Target audience: Insights into the demographics and preferences of the end users.
- Scope of work: Clear definitions of deliverables and formats required.
- Timelines and checkpoints: Milestones for review and final deadlines.
- Budget constraints: Guidance on resource allocation to avoid overextending.
A kickoff meeting is the perfect way to get everyone on the same page and set the stage for a successful project. It clarifies any uncertainties, aligns expectations, and establishes a clear vision for the design. Sharing reference designs or examples during this discussion helps the team visualize the direction and ensures that everyone starts off with the same goals in mind.
Read Also: Best Custom Graphic Design Agencies for Creative Graphics
2. Conducting Research
Researching graphic design styles that look great but also connect with the target audience is top priority. By understanding audience preferences and graphic design trends, this step builds a strong foundation for making thoughtful design choices.
Key areas to explore include:
- Competitor analysis: Study what works and doesn’t in similar projects.
- Industry trends: Stay updated on evolving practices and fresh graphic design approaches.
- Audience insights: Delve into user preferences, pain points, and engagement behaviors.
- Content relevance: Ensure alignment between the client’s core message and user expectations.
✅ Pro tip: Interested in using ai for user experience design? Discover practical ways AI can enhance usability testing, personalization, and design efficiency.
Translating this research into mood boards or audience personas helps clarify the design direction, creating a strong visual and conceptual foundation that ensures the final product is both relevant and impactful. For example, a mood board could highlight color palettes and typography that appeal to your audience, while personas can guide graphic design choices by focusing on user-specific needs.
Need on-brand graphics that wow your audience? Duck.Design is your go-to partner for everything from landing pages to motion graphics. Simplify your graphic design process without compromising on quality.
3. Creating Initial Concepts
This stage transforms research into tangible ideas, balancing creative exploration with strategic intent. The goal is to produce user-centered design concepts that meet project objectives while remaining adaptable for refinement. When developing concepts, focus on composition to keep layouts balanced and visually clear.
Steps to develop effective initial concepts include:
- Brainstorm ideas: Sketch layouts or create mind maps inspired by research findings.
- Low-fidelity wireframes: Outline basic structures without overloading details.
- Mid-fidelity mockups: Introduce graphic elements like typography, color schemes, and imagery to refine the visual direction.
- Collaborate with the team: Encourage diverse perspectives to enhance creativity.
- Keep concepts flexible: Allow room for iteration and adjustments.

4. Feedback and Iteration
Constructive feedback is a cornerstone of refining designs to meet project objectives and client expectations. But, handling feedback effectively requires a structured and straightforward approach to avoid confusion and keep the project on track.
Best practices for managing feedback:
- Share drafts at key stages: Present concepts at distinct milestones, like wireframes, prototypes, and polished versions. This keeps feedback focused and relevant to the project phase.
- Consolidate feedback: Use tools like Figma or Google Docs to organize and prioritize comments. Group similar suggestions to streamline revisions and avoid duplicating effort.
- Address input holistically: Focus on recurring themes in feedback. For instance, if multiple reviewers flag layout concerns, prioritize those over minor tweaks.
- Maintain version control: Track changes across drafts to prevent miscommunication and ensure you can revisit earlier designs if needed.
- Set clear deadlines: Define timelines for feedback and revisions upfront, and communicate them clearly to avoid delays.
✅Pro Tip: Ask stakeholders to share feedback by highlighting both positives and areas for improvement. Questions like “What’s working well?” and “What could be better?” can lead to more actionable and collaborative input, moving the project forward smoothly.
Read Also: Choosing Between a Graphic Artist and a Graphic Designer: What’s Best for Your Project?
5. Approval of the Concept
Securing approval is a pivotal step in the graphic design creative process. It confirms the design’s alignment with objectives, solidifies stakeholder agreement, and sets the stage for finalization. Without this step, teams risk scope creep, misaligned expectations, and delays in delivery.
Steps to gain concept approval:
- Present finalized designs: Highlight how the designs align with project goals, such as boosting engagement or reinforcing brand identity. Draw attention to key elements tied to the objectives in the brief.
- Document feedback and changes: Keep a detailed record of all comments and revisions from approval meetings to ensure transparency and provide a clear reference for the team.
- Involve all stakeholders: Ensure all decision-makers are present to avoid additional feedback loops or last-minute changes later on.
- Showcase real-world applications: Use mockups or contextual visuals to demonstrate how the graphic design works in practical settings, like packaging, websites, or ads.
- Set clear boundaries: Confirm that only critical changes will be considered post-approval, allowing the team to move forward with confidence.
✅Pro Tip: Give stakeholders a list of things to look at, like how well the brand fits with the wants of the audience and how easy it is to use. A list will help them keep their attention on the most important things, so they don’t give feedback that isn’t needed or isn’t significant. This will speed up the approval process.
6. Developing The Final Design Version
At this stage, it’s all about fine-tuning the details to make sure the design is polished, practical, and ready to go. The final version pulls together all the work and collaboration from earlier steps, so precision and quality really matter.
Tasks in developing the final version include:
- Apply branding consistently: Double-check that fonts, colors, and logos stick to the brand guidelines. Consistency strengthens brand identity and helps create a cohesive look.
- Optimize for formats: Adapt designs to the right formats, whether it’s for print, digital, or social media. For example, ensure web layouts are responsive or that print designs meet resolution requirements.
- Conduct usability tests: Test the design to confirm it’s both functional and visually appealing. This might involve verifying that a website’s interface is user-friendly or that print materials meet production standards.
- Address final feedback: Make any last adjustments requested by the client to ensure the graphic design meets their expectations.
✅Pro Tip: Use a final checklist that covers technical specs, brand compliance, and formatting requirements. It’s a simple step that can catch overlooked details and prevent last-minute headaches.
7. Integrating Design into Project
The last stage is to make sure the design fits in with its purpose, whether it’s a marketing campaign, a website, or product packaging. An essential component of any creative design process, this step connects conceptualisation with implementation.
Steps for effective integration include:
- Deliver assets in all formats: Provide files optimized for different uses, such as print-ready PDFs, web-optimized PNGs, or scalable vector files for larger displays. Ensuring compatibility across platforms avoids implementation delays.
- Collaborate with teams: Work closely with developers, marketers, or printers to address technical requirements and ensure smooth implementation. For instance, provide developers with design specs like hex codes or spacing guidelines for digital design assets.
- Quality assurance checks: Review all deliverables against the initial brief to confirm they meet the project goals. Test functionality, such as ensuring graphics display correctly on various devices or print materials meet production standards.
- Provide documentation: Include a style guide or instructions on using the graphic design elements consistently. This can be particularly helpful for future projects or updates, ensuring brand alignment over time.
✅Pro Tip: Build a handover checklist that includes file formats, usage notes, and team contacts for troubleshooting. This not only smooths the transition but also sets up future projects for success.
Let’s Collaborate
Common Challenges in the Graphic Design Process and How to Overcome Them
The graphic design process is full of creative potential but also comes with challenges that can disrupt progress and outcomes. Recognizing these hurdles and applying practical solutions can help keep projects on track.
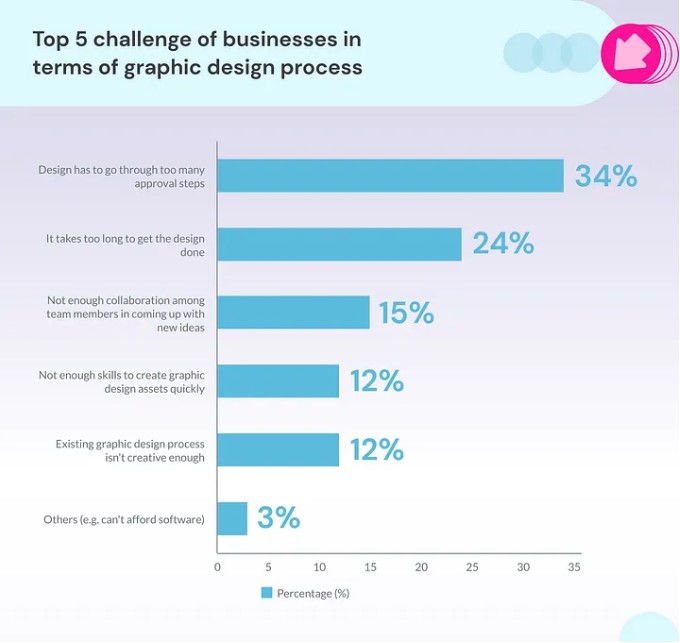
1. Miscommunication Between Clients and Designers
Unclear briefs and mismatched expectations can lead to delays and endless revisions. In fact, 34% of businesses say designs get stuck in too many approval steps, slowing everything down. A clear, detailed brief with well-defined goals, audience, and deliverables helps avoid this. Keeping feedback rounds structured and using tools like Trello or Asana makes communication smoother and keeps everyone on the same page.
✅Pro Tip: Schedule quick weekly check-ins to address issues early and maintain alignment without lengthy meetings.
2. Managing Feedback and Revisions
Conflicting or disorganized feedback can quickly stall progress, particularly when multiple stakeholders are involved. To avoid this, establish a structured feedback process with clear review stages. Tools like Figma’s annotation feature or version control systems help keep changes organized and easy to track. Consolidating all input into one actionable list ensures clarity and prevents unnecessary confusion.
✅Pro Tip: Assign a single person to handle approvals so that different parties don’t give you different instructions.
3. Balancing Creativity with Tight Deadlines
Tight deadlines can hinder creativity and lead to rushed designs. To manage this, set realistic timelines early, focusing on the most critical design elements first. Techniques like task batching or the Pomodoro method can boost focus and efficiency. Including milestones in the timeline provides room for creative adjustments while maintaining steady progress.
✅Pro Tip: For design jobs that you do regularly, like creating graphics for social media, use templates. This will free up your time for bigger, more complicated projects.
4. Maintaining Brand Consistency Across Projects
Inconsistent branding can confuse people and hurt trust. All of your designs will look more consistent if you have a clear style guide that includes rules for color schemes, fonts, images, and tone of voice. By checking projects against the guide on a regular basis, you can ensure uniformity and find any mistakes before they get to your audience.
✅Pro Tip: Store and share style guides on cloud-based platforms like Canva’s Brand Kit or Figma libraries for easy access and real-time updates.
5. Keeping Up with Design Trends and Technology
To stay current in the fast-paced world of graphic design, you need to keep up with new technologies and trends. Using outdated tools or ignoring changes in the industry can quickly make designs ineffective. Read newsletters in your field, go to classes, and look for new ideas on sites like Dribbble and Behance to stay ahead. Upgrading to tools like Figma or Adobe Creative Suite improves both quality and teamwork, and regular team training ensures that everyone is ready to use the latest features.
✅Pro Tip: Dedicate time in each project for exploratory work. Testing new tools or experimenting with trends within live projects ensures your designs remain innovative and relevant without disrupting timelines.
Improve Your Brand Look with Duck.Design’s Subscription-Based Graphic Design Services
Duck.Design knows how important it is to have a strong brand identity. That’s why our graphic design services are based on subscriptions so that your business can get professional design that is easy to use and reliable.
Our subscription model is simple: pay a fixed monthly fee, and get unlimited graphic design services. Whether you need fresh social media graphics, updated branding, packaging designs, or polished UI/UX elements, we deliver high-quality results without surprise costs. For urgent tasks, we even offer same-day delivery to keep you moving forward.
Why choose our subscription-based services?
- Fixed pricing makes budgeting simple.
- Unlimited revisions ensure your designs are perfect.
- Same-day delivery keeps urgent projects on track.
- Expert designers make your brand stand out.
We also stay ahead of design trends and leverage the latest technology to ensure your brand stays modern, engaging, and effective. With Duck.Design, you get a reliable, flexible design partner that’s committed to helping your brand look its absolute best.
The Steps We Take to Ensure Client Satisfaction from Start to Finish
At Duck.Design, we prioritize your satisfaction by creating a streamlined process that delivers outstanding results from start to finish.
Step 1: Onboarding
We start by understanding your goals, brand identity, and project needs. This includes discussing your vision, reviewing existing materials, and setting clear priorities. Our detailed onboarding ensures we’re aligned from day one.
Step 2: Team Assignment
We match your project with designers who have the right expertise, whether it’s crafting creative graphics, digital ads, or user-focused UI/UX designs. This tailored approach ensures your brand’s style and goals are met seamlessly.
Step 3: Structured Feedback Loops
Using our Duck.Design platform, you can provide clear, actionable feedback directly on drafts. Scheduled review stages keep the process efficient, capturing essential adjustments without delays.
Step 4: High-Quality Delivery
After incorporating feedback, we deliver polished, professional designs tailored to your needs. From logos to marketing materials, every asset reflects your brand’s identity and surpasses expectations.
With Duck.Design, you’re not just hiring a graphic design service — you’re partnering with a dedicated team committed to bringing your vision to life.